Tig Welding - How to Tig Weld | R-Tech
-
I want to do some TIG Welding. Do I need a DC or AC/DC TIG welder?
There are two types of TIG welding prcoesses available.
DC is used to weld mild steel, stainless steel, copper & brass, inconel and titanium etc.
AC is used to weld Aluminium and other alloys.
You can buy either a DC TIG Welder or an AC/DC TIG Welder
You will need to use 100% Pure Argon for shielding gas.
See our range of TIG Welders -
What are benefits of AC Frequency Control on your AC-DC Tig Welders?
AC Frequency Control is only found on advanced Inverter Tig Welders, on traditional tig welders the frequency is fixed at 60Hz
On our AC/DC Tig Welders you can adjust this up to 250Hz, this reduces the width of arc from the tungsten tip producing pinpoint accuracy of weld pool, less heat deformation and faster travel speed.
If you have never tig welded before, being able to adjust the AC Frequency makes welding easier for the beginner. -
How does the foot pedal work on a TIG Welder
This allows you to control the amperage when actually welding which is very beneficial especially when welding aluminium or exotic steels / alloys. It acts like a car throttle controlling the amperage.
You simply unplug the torch switch plug from machine and plug in the foot pedal.
You then set the main control amperage on machine front panel to the maximum you wish the foot pedal to go to on a maximum depression. So if you set the main amperage control to 100amps, when fully depressed the foot pedal will give 100amps. If set to 40 amps, it will go from minimum amps to 40amps allowing fine control of amperage.
Note: Some competitors foot pedals have the maximum amperage knob on the side of the foot pedal, so it can be hard to see what the maximum has been set and also easily knocked as on floor, this is quite an old fashioned way (we changed to machine control of foot pedal max amps over 17 years ago)
Once a weld pool is formed and you are moving along the weld as the heat transfers into the workpiece you may require less amperage as the weld pool width / penetration will get too hot, reducing the welding current with foot pedal will stop this happening.
Over a 300mm long weld, you may need 100amps at the beginning and only 80 amps at the end of weld. Using a foot pedal will give you a uniform weld bead size.
It also allows you to back off the heat from weld if you need to reposition torch / get new filler rod but don't want to stop the weld I.E When doing pipework etc which requires one continuous weld.
Most experienced tig welders prefer to use a foot pedal especially on aluminium and exotic steels / alloys, unless the welding is not being done at a workbench i.e. working on a car etc. -
What are the benefits of a water cooled tig welder
A water cooled tig welder has 2 main benefits
1: It allows you to use a lightweight torch at high amperages especailly suited for production tig welding. You can tig weld with an air cooled torch at high amperages but the torches are quite bulky and heavy for the operator.
2: An air cooled tig torch can get quite hot and become uncomfortable for the operator, a water cooled torch runs a lot cooler therefore is much more comfortable for the operator.
A water cooled tig welding system comprises of the tig welder power source and a separate water cooler unit which gets its power direct from auxillary power socket on rear of Tig Welder. So when you turn on the tig welder the water cooler comes on automatically. This stops nuisance torch burn outs when the water cooler is powered from a separate 13A plug and the user forgets to turn it on with the tig welder.
There are many different tig torches to suit different applications, if you unsure what torch/system you require please give us a call on 01452 733933 and we can advise you what is best for you job.
We also have a customers video "how to setup a water cooler and water cooled tig torch" -
I need to TIG weld aluminium but I need some help choosing right machine / process.
If you wish to weld aluminium, at R-Tech we have many machines which will do this for you.
You will need an either an AC/DC TIG welder or one our Inverter MIG welders fitted with a spool on gun to weld aluminium.
AC/DC TIg welders are best suited to weldining aluminium and this process uses the AC function (DC is for welding steels only).
The weld material (FIller rod) is insterted by hand into the weld pool so is a two handed operation and requires some pratice.
In addition you will also need a white tipped tungsten (Zirconiated) for the end of the torch and a suitable aluminium TIG filler rod.
We have a range of How to TIG weld videos here which will show you how to setup machine and carry out the weld. This covers Digital and Analogue TIG welders, and 4 welding processes of Lap Weld, Butt Weld, Fillet Weld and Outside Corner weld - If you are new to TIG welding they will be a great help to you.Inverter MIG welders fitted with a spool on gun are another way of welding aluminium, the wire is very soft so on a spool gun the wire reel is very close to the rollers so stops the annoying wire breaks / snarls you can get when using a standard 3M MIG torch. This is more suited to gneral welding jobs as the finsihed weld is not as pretty as TIG welding. You will require 100% pure argon gas, normal steel welding gas can't be used.
We have a range of how to aluminium MIG weld with a spool gun videosAluminium and its alloys conduct heat more quickly than steels and therefore have different properties when TIG welding. We have a page dedicated to the characteristics of aluminium and you can read more by visiting the Aluminium Welding Information page.
-
How do I assemble my TIG torch?
Arranging the component parts of your TIG torch is straightforward. The diagram below will show the correct order of assembly to enable the torch to be set up correctly.
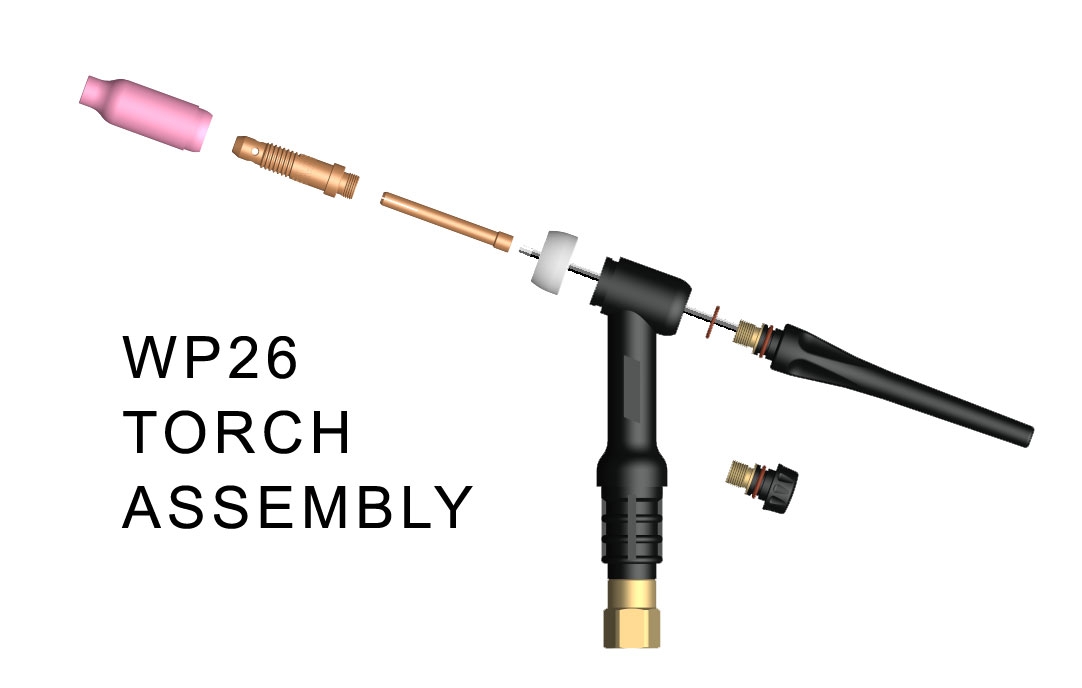
The torch consists of a number of elements. The tungsten electrode needs to be secured in the torch. This is inserted into the main body and secured by a screw type back cap.
At the front of the torch a small white heat shield fits over the front of the torch body. Over the tungsten a collet must be fitted followed by a collet body that screws into the main body of the torch. The final part to be assembled is the ceramic which also screws into the body of the torch head. -
What Are The Benefits Of TIG Welding?
Advantages Of TIG Welding
Welding Aluminum - When welding aluminum, you tend to find this process a lot easier when using an AC/DC Tig welder. You will have much more control over the welding arc which will significantly reduce the risk of burning holes through the work piece. We suggest using a foot pedal when TIG welding aluminum as it greatly increases your control over the arc.
ARC Power Control - We briefly touched on this above, when using a foot pedal, you have complete control over the power output of the machine. This can be done via the torch switch also, it may not be the same control you would achieve with a foot pedal however it is more than you would have over a MIG welder. By setting the base amps, your maximum amperage and the time it takes for your machine to slope upwards toward that maximum amperage, you can ensure that you are gently applying heat to the work piece.
A Great All-Rounder - As you only use pure argon gas for TIG welding, paired with a lanthanated tungsten, you should find it very straight forward to go from welding mild to stainless steel and then over to aluminum without changing a single consumable. Not only is a TIG welder versatile in the material it can weld, it is extremely versatile in the positions you are able to weld in, be this flat on a bench, vertically and horizontally.
Cleanliness - Welds produced by a TIG welder are extremely clean and should require no cleaning, this makes whatever it is your are working on, ready to go as soon as the weld is completed. As TIG welding produces little to no sparks, spatter is significantly reduced. Most machines come with a cleaning function, this is where the arc does a lot of the cleaning without you even noticing. This certainly saves you a lot of time!.
Disadvantages Of TIG Welding
It's a slower process than MIG welding - TIG Welding takes time however the time and patience does pay off when you see the results that are achieved. If you are looking for a quick fix however, this is where a MIG welder may be the better option.
It's a steep learning curve - There is a lot of learning involved when it comes to TIG Welding. If you have ever gas welded in the past, you have a head start due to the process being very similar. Once you grasp a TIG machine however, the rewards for your efforts are more than worth it!. With our new range of TFT TIG Welders with Easy-Set Technology you can get TIG welding quickly and easily just buy entering material thickness and type of material, the machine sets all required settings, you just press the torch switch or foot pedal and you can put down a lovely weld.
Gasless isn't an option - Gas is required for all types of TIG welding and therefore makes welding outside with the machine a little more difficult if there is nothing to protect you from the wind.
-
What is Meant by Duty Cycle on a TIG Welder?
Duty Cycle refers to how long a machine will operate for before it automatically stops the welding ARC to protect its components from overheating.
A 60% duty cycle at 200 amps would mean that you are able to weld at 200 amps for a maximum of 6 minutes out of 10 before the machine shuts off to cool down.
Higher duty cycles at higher amperage indicate a machine is made from more high quality components, built to withstand the stresses welding places on them.
We believe on a minimum of 35% duty cycle, most of our machines are 60% at maximum amperage. Built to last, ideal for all users - Industrial, D.I.Y, Home workshop.
At R-Tech we believe in building machines to last, with minimum down time to our customers, so we fit the most reliable power modules and IGBT's available coupled with oversized heatsinks. Therefore our machines are able to work harder for longer!
We also quote our duty cycles at machines MAXIMUM amperage unlike some manufacturers who sneakily quote duty cycles NOT at maximum amperage which can be quite misleading! Duty cycle is very important, 20% is not an industrial duty cycle.
I.E Competitors state on thier 200amp machine, 60% duty cycle @140Amps.. So what is the duty cycle @ 200Amps?? -
What gas is required for TIG Welding?
Pure argon is the only gas required for TIG welding. It doesn't matter what material you are welding or the thickness of the material, pure argon is your go to. If you try to introduce any co2 to a TIG weld, you would see the weld becoming a bit bubbly and black in colour.
An interesting fact about pure argon is that it is more environmentally friendly than other gases used in welding.
The gases role is to act like a shield around the arc, you will sometimes hear people refer to it as a shielding gas. It protects the weld pool from becoming contaminated from the surrounding atmosphere, i.e. we rely on oxygen to breathe however if this gets into the weld pool you will get something called oxidation which effects the strength and integrity of the weld. The gas also helps with maintaining a stable arc which ensures you are getting the best penetration into the material.
Gas Tips
Correct flow rate - It is important that your flow rate is set correctly. An incorrect flow rate can result in imperfections in the weld, damage to the tungsten if TIG welding and an a waste of gas. We suggest using a flow meter to really fine tune the rate. On our Easy-Set AC/DC TIG Welders the suggested flow rate is shown on screen. For DC welders with steel / stainless we recommend about 7-9 LPM.
Black / Dark Tungsten - If you notice your tungsten is going black at the end, you do not have the correct gas coverage shielding the arc or not enoguh post flow gas. Up your flow rate and see if this makes a difference and also check your post flow gas time, this is how long the gas continues to flow from torch after trigger is released, this cools the tungsten and also stops oxidiation of tungsten and weld during the cooling process. -
What is pulse TIG welding?
We often get asked what pulsing is and how important it is.
When you pulse weld with TIG, you output a pulsed waveform, alternating between base and pulse currents, instead of steady current.The Advantages Of Pulse Welding
The specific advantages of pulsing include achieving a given weld penetration with less power and heat – thus avoiding metal deformation, particularly with thin sheet metal and ideal for stainless steel and other exotic steels.
Although you can pulse weld aluminium, it’s more usually associated with steel – particular stainless steel where work-piece overheating can so easily undermine weld integrity and appearance. As such, this method of welding sits alongside another advanced technique, gas purging.
Pulse welding is undoubtedly a powerful TIG technique and a great feature for a machine to have. It is an advanced welding technique. We often talk with novice welders who think they’ve failed at TIG because they don't know this method of welding. Our response is not to worry. Instead, we counsel that they should focus instead on perfecting good basic TIG technique – and look forward to adding pulse welding later.
Of course, at higher levels of commercial production welding, pulsing is important; but for most amateurs and many commercial welders, it’s simply not essential; in our experience, many superb TIG welders can’t use this method! Of course it’s good to be ambitious and take your welding as far as possible, but experience shows that over-emphasising the importance of pulsing may even be counterproductive if it introduces unhelpful extra difficulty to the already-complex TIG process.
Three Key Parameters
Pulse welding relies on correct setting of three key parameters.
Pulse width is the duration of the pulse across each second of welding (typically 0.1 to 0.9/second).
Pulse percentage refers to the relationship between the base current and pulse current.
Pulse frequency, which is normally anything up to 500-999Hz. With digital welding machines, set-up of the three parameters is screen-based. Either way, there’s no magic setting for guaranteed results. As ever, experience, knowledge, judgement and practice are the keys.Though the theory is relatively simple to understand, in practice, knowing how to set up your welder to give just the right pulsing is extremely challenging for novices. Even as a pulsing master, it isn’t a technique where you just dial in three settings to get perfect results every time. There’s no substitute for practice; our best advice is to start at 50% pulse width and amperage percentage, set the frequency at 1hx (1 pulse per second) and then turn it up until you feel conformatable with the speed and penetration of weld.
Does Easy-Set Technology make pulse welding easier?
Indeed it does, on our AC/DC TFT TIG welders we have built in 5 pulse programs for you, simply enter the weld thickness, type of joint as per normal, then slect 1-5 in pulse setting and press the trigger and you can lay a pulse weld down. 1 is low Hz and 5 the highest.
Call Us For Advice
With decades’ experience in welding, there’s not much we haven’t seen, including pulsing for TIG welding. Whether you’re just starting, or an experienced TIG welder facing pulsing for the first time, we can help with honest advice – and a great range of welding machines suitable for pulse welding.
-
What is gas purging when TIG welding?
Have you been trying pipe welding with stainless steel for the first time and noticed unwanted discolouring due to oxygen contamination inside your weld? Or maybe you’ve welded a vehicle exhaust and seen the same effect. Perhaps gas purging could have helped the quality of your weld.
When you need to protect two sides of a weld from oxygen contamination, gas purging often holds the key. Of course, there’s the gas purging you might face as a hobby welder or small commercial welding operation, then there’s the gas purging you find in high-end welding, way up in the welding stratosphere above where we – maybe you too – work. At that level, we’re into super-specialised techniques such as argon-bath welding. It’s the work, with stainless steel, titanium and exotics such as Inconel, using specialised argon-helium mixes and strictly-certified welding processes, that takes place at the high-end of advanced aerospace and F1 engineering. Interesting though it is, we’re looking at something much more mundane – but equally important for welders like us.
Gas purging for pro and amateur TIG welders
What we’re focusing on this week is basic argon gas purging as it affects DIY welders or smaller professional welding shops. Maybe, as our lead-in suggests, you’ve had a cracked weld on a piece of architectural metalwork, or a ‘crunchy’ gas-flow-inhibiting weld inside a stainless motorcycle exhaust. Theoretically, though we don’t recommend it, you could MIG weld stainless steel. More likely, however, you’ll be TIG welding. In our experience, most of the specialist-metal welding that benefits from gas purging is being done with the TIG process.
Why gas purging is important?
Before we get into the in's and out's of gas purging, we must say that weld contamination, maybe in the form of ‘sooty’ welds, is never down to the welding machine itself. Instead, experience shows that gas contamination, interaction with non-purged air and other causes are usually responsible. Often, particularly where front and back of a weld are equally exposed to atmosphere, or where the inside of tubular fabrications contain the back of a weld, gas purging makes a huge difference to weld quality. Fortunately, it’s not as hard as you might imagine…
Displace contaminating oxygen
You’ll have worked out that material at the back or inside of a weld will be exposed to potential oxygen contamination. To get around this, you (perhaps helped by a colleague) need to displace the air – not just around the weld pool, but on the back of the weld.
You do this with a second flow of pure argon, ideally created with a second gas hose leading from your regulator. And because you may need to vary the primary (front of weld) and secondary (back of weld) gas flow, we recommend fitting dual argon flow meters downstream of a double-outlet gas valve Y piece (or ‘Y-splitter’). Of course, the splitter itself is downstream from the gas regulator.
Why we recommend two flow meters
Why would you need to vary the two gas flows? What if you’re temporarily sealing the inside of a pipe during welding? First, you’ll displace oxygen with a higher gas flow before temporarily sealing the end of the tube. Then you’ll turn the gas down to maintain purging. Similarly, you might want one gas setting at your electrode tip, while your assistant follows along the back of the weld with the secondary argon jet. Trust us, though it might be tempting to put a single flow meter upstream of your Y-splitter, it’s not recommended.