Plasma Cutting Guide
Once you have used a plasma cutter you will never want to go back to using oxy-fuel cutting, grinding discs or anything else of the sort. Plasma cutters are an amazing tool to have in any metal working environment, they are easy to use and cheaper to run than oxy-fuel cutting.
What is plasma cutting?
Plasma cutting is a quick and simple way to cut any metal that conducts electricity. Operating a hand-held plasma cutter is actually very simple.
How does a plasma cutter work?
Plasma cutters use DC voltage to heat compressed air to a very high temperature, where it ionises the atoms and creates a "plasma arc". This flows through the narrow hole of the cutting tip (normally 0.9mm - 1.5mm) at a temperature of about 25,000 - 30,000 degrees Fahrenheit.
The small jet of plasma pushes through and melts the metal and pushes the molten metal away. It is highly focused when compared to oxy-fuel cutting and comparative results.
What metals does a plasma cutter cut?
Plasma cutters will cut any metal that conducts electricity such as steel, stainless steel, aluminium, copper, brass and other conductive metals.
6 easy steps to set up a plasma cutter:
Step 1) Connect your plasma cutter to a suitable air compressor.
Step 2) Connect your plasma cutter to a 240V or 415V supply (depending on the machine purchased).
Step 3) Connect the earth lead to your workpiece.
Step 4) Connect your plasma cutting torch to the plasma cutting machine.
Step 5) Select your cutting amperage (more amps for thicker materials).
Step 6) Press the switch on your torch handle and move the torch across the work as the plasma arc cuts the metal.
You can start from the edge of work or pierce a hole in the middle of the metal. Cut perfect circles with a circle cutting kit and make unique shapes using a template.
As there are no heavy gas bottles to lug around, plasma cutters are fairly portable and the minimized heat affected zone with small cut width compared to oxy-fuel cutting is a great benefit.
Which Plasma Cutting machine do you need?
First, you must find yourself the answers to the below questions:
- What input voltage do you have in your workshop, 240V or 415V?
- What is the maximum thickness of the metal you want to cut?
- Do you have a supply of compressed air? (You will need an air compressor to supply compressed air to the plasma cutter.)
Second, have a look at which one of R-Tech's Plasma Cutters is suitable for your needs:
Our R-Tech P31C plasma cutter requires a 240V 13A supply so is very portable and suitable for DIY & light industrial use. It has an automatic cutting start via HF contact start. It features an 8mm clean cut and 12mm severance cut on mild steel.
Our R-Tech P51D plasma cutter requires a 240V 32A supply which is generally found in most workshop environments. It has automatic cut starting via pilot arc starting with auto-restart and features a generous 18mm clean cut and 24mm severance cut on mild steel.
Our R-Tech I-Cut100 plasma cutter requires a 415V 3-phase 22A supply which is found in industrial workshops. It has automatic cut starting via HF pilot arc starting with auto-restart and features a massive 32mm clean cut and 40mm severance cut.


What are the two Plasma Arc starting differences?
1. HF Contact start
HF contact start uses high-frequency generated inside the machine to jump the gap between torch cutting tip and workpiece, so you simply rest the tip onto the workpiece, press the trigger and the machine will automatically start cutting.
2. HF Pilot Arc Start (with auto-restart)
HF Pilot arc start again uses high-frequency generated inside the machine and when the trigger is pressed a pilot arc flame will come out of the cutting tip about 1 inch long. When this pilot arc touches the workpiece the machine will sense this and start the main cutting amperage. This has the benefits of being able to start on heavily painted or rusty surfaces etc.
It also features pilot arc re-start which is ideal for cutting mesh and metal with gaps etc. When you have come to the end of metal, the machine will sense this and re-engage the pilot arc so when you move the torch to the next piece of metal it will sense this and re-start the main cutting power. This saves you having to release the trigger and re-press to start the arc again.
What is the difference between a Clean cut and Severance cut?
Clean Cut
A Clean Cut is where the machine will cut all the way through the material and the cut parts will fall away from each other leaving only minimal dross on the bottom edge which can easily be pulled off using pliers etc.
The cutting marks will start off straight and then give a slope of a small angle towards the bottom of the cut. The metal should require no extra working before being welded together etc.
Severance Cut
A Severance Cut is where the user is using the machine close to its maximum cutting thickness capability. The cutting speed will be much slower compared to a clean cut and the metal will require some cleaning up towards the bottom edge.
Plasma Cutting speed, amperage and cutting tip size.
Your cutting speed when plasma cutting is dictated by the amperage used and the size of the material to be cut.
If you are cutting 4mm with a 30A machine, you could either set the amperage to 20A and have a medium travel speed, or you could set the machine to maximum 30A (which will cut 8mm clean) and enjoy a faster travel speed, however you may experience slightly more dross at the bottom of the cut this way.
What happens if you cut too slow?
If you cut too slow you may experience the arc cutting out with a contact start HF machine, or if using a pilot arc machine, it may start to splutter (going between pilot arc and main cutting power). You will also get heat input into work and experience more dross at the bottom of cut - so increase your travel speed or reduce cutting amperage.
What happens if you cut too fast?
If you cut too fast you will experience two things:
- Poor cut quality. As you have not cut all the way through the material it will not break away from each other at the end of the cut, and it will require a lot of cleaning up before use.
- The blowback of dross. As you have not cut all the way through and have moved the torch, the dross (cut metal) will not be able to blow out the bottom, so it will blow at a severe angle at the bottom and if you are moving far too fast, it will blow back towards the operator.
How to tell if you're cutting at the right speed.
When starting from the edge of the work ensure the metal has been cut through and the dross is coming out at a maximum of a 10-20 degree angle. Then start moving the torch along the work ensuring the dross angle does not increase.
If the angle starts to increase close to a 45-degree angle, slow down the cutting speed. If you struggle to get a good clean cut and small angle of dross coming out the bottom of the cut, try increasing the cutting amperage.
How to do Piercing with a Plasma Cutter (Not starting the cut from the edge of the metal)
When piercing metal at the start, this will result is dross being blown back up, so the normal practice is to hold the torch at a 45-degree angle to work, so the dross blows away from the operator.
Once the cut has started, slowly move the torch to the 90-degree angle to work to enable the cut to go all the way through the material. Once you have gone all the way through, you may start to move the torch.
Please note:
- Piercing will shorten tip life due to more dross blowback.
- You can normally pierce metal up to 1/2 the maximum cutting thickness the machine is capable of.
What is Gouging when using a plasma cutter?
Gouging is used when you may want to remove an old weld or defect in metal and is suited to machines with HF pilot arc starting. You will need to use a special gouging tip which has a much larger hole than a standard cutting tip.
Hold the torch at about 45 degrees to work and adjust arc length (the distance between the cutting tip and metal) and speed to blow away unwanted metal.
Please note:
- Do not attempt to gouge too much at one time, multiple passes may be required.
- Be aware that sparks/dross will be generated in this process and to guide dross away from torch/user and take care with other staff in the cutting area.
Plasma Torch Consumables
A plasma torch head has 3 main consumables which will require replacing the most:
- Cutting tip.
- Electrode.
- Stand off spring.
The other parts which are the outer retaining nozzle and swirl ring (gas distributor) require less frequent replacement.
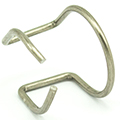
Stand off spring or pointed spacer
This fits onto the end of the outer nozzle and keeps a distance of 1-2mm between tip and workpiece. This can be removed if you wish to use a straight edge or template for cutting shapes.
Outer Nozzle
This screws onto the head and holds the tip/electrode in place.
Cutting Tip
Available in different hole sizes. The larger hole for larger amperage / wider cutting arc.
1.1mm for up to 60A, 1.3mm for 80A and 1.5mm for 100A.
Electrode
This screws into the torch head.
Gas distributor
This fits between the tip and the electrode and is made of a non-conductive material.
 |
 |
 |
| Stand off spring | Double pointed spacer | Retaining nozzle |
 |
 |
 |
| Cutting tip | Electrode | Gas distributor |
What air pressure is required for plasma cutting?
You must select a suitable air compressor to be able to supply the correct amount of air flow to your plasma cutter. Using too small an air compressor will result in the air compressor running all the time, and also the lack of correct air pressure to the plasma cutter will result in a poor consistent cut.
For our R-Tech plasma cutting machines, we recommend the following air compressors as a minimum to achieve good cutting results:
I-Cut100P Plasma Cutter: A 3HP 100L Air Compressor - Like our Fiac Workhorse 3HP 100L 13CFM Air Compressor
All plasma cutters require a clean dry compressed air supply. Ensure your air compressor is drained regularly. All our plasma cutters come fitted with an air pressure regulator with a water trap on the rear of the machine.
If this water trap has signs of water, drain the water trap and air compressor more often or fit an in-line compressed air dryer like our Compressed Air Dryer.
What is the post flow air/gas?
When the cutting has stopped air will continue to flow from the torch tip for a preset time, this is to allow the torch components to cool down.
How to cut circles with a plasma cutter?
You can easily cut perfect circles using a circle cutting kit.
This comprises of a 2 wheel guide that attaches to the head of the plasma cutter which incorporates a bearing, so the head can rotate in the guide. You then have extension bars which screw into the head guide and into the centre of the hole holder which can be magnetic, secured via a drilled hole or a small indent in work. These will generally cut circles from 70mm to 800mm.

Plasma cutting from a template
If you wish to cut the same shape in multiples, you can make a template from a non-conductive material and hold the cutting tip against the template. As there is an offset from the side of the tip to the centre hole, you will have to allow for this when making your template.
Cutting straight lines when plasma cutting
If you wish to cut a very straight line, simply use a non-conductive material with a straight edge to run the cutting tip along.
Spacer Spring/wheel guide
To enable easier cutting and pro-longing tip life, our R-Tech plasma cutting machines come with a stand off spring which holds the tip about 1-2mm from the workpiece.
You can also use the 2 wheel guide from the circle cutting kit, which allows smooth travel across the work, as this is less affected by bumps in metal when compared to a stand off spring.
Safety
Follow the correct safety procedures as stated in the owners manual.
You will require safety goggles like our Flip Front Plasma Goggles to protect eyes from the plasma arc and suitable welding gloves and non-flammable work clothing.
Please ensure you follow all relevant health and safety procedures as stated by your company.
Please ensure you follow all relevant health and safety procedures as stated by your company.
Plasma Cutter P30C and P50HF Video Demonstrations/Tutorials
Video showing setup and cutting with our R-Tech P30C Plasma Cutter:
> R-Tech P30C Plasma Cutter Demonstration Video
Video reviews by Doubleboost showing setup and cutting with our R-Tech P51D Plasma Cutter: